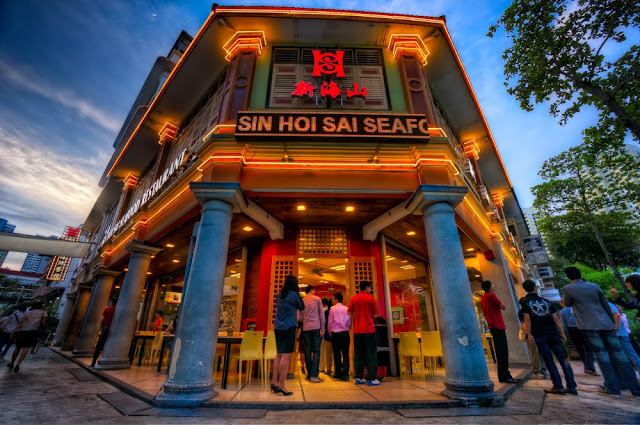
Behind the scenes
I set up half an hour before sunset. The light disappears fast near the equator. As soon as the light started fading the restaurant owner obligingly turned on the neon.
I had visited Tiong Bahru the day before but in the middle of the day and although it was a useful scouting trip, the light was all wrong for this shot . . . and the restaurant was very quiet with the outside chairs and tables stacked up against the wall.
I spent 6 hours processing the image. I know, way too long. I'm using a lot of techniques I've only read about. I'm sure over time I'll get quicker.
.jpg) |
| Before |
 |
| After |
Kit
My new Sony NEX-6 with E 10-18mm f4 OSS lens on it's first serious outing, mounted on my old trusty Gitzo G2227 with Real Right Stuff BH-55 head - small camera, big sturdy base.
Shots
I took 7 shots at 1 stop intervals from -3ev to +3ev, ISO 100, f8 at 10mm (15mm - 35mm equiv)
I then took half a dozen additional images at normal exposure but ISO 800 to capture the people. I didn't mind a little movement but on the whole I didn't want too much blur. These additional exposures were 1/8 of a second so I had to time it just right when people briefly stopped. In my final image I used three additional frames adding in three waiters and the large group on the left and central group and group walking down the alley.
Hardward
27 inch 2011 iMac, images on internal disk, OS and software on external 256GB Lacie SSD hooked up to the thunderbolt port for awesome speed.
All my images are backed up every night to an Airport Extreme, an external 2GB Lacie drive and my Synology NAS with mirrored disks. I'm pretty paranoid about hard drive failure. All stuff copied to the NAS goes off site using Crashplan.
I use a dinky wacom tablet for brush work. I'd rather zoom in on screen and not have to move the pen around too much. This is my second attempt at using a tablet and first time in anger for five years. I like!
Software
I use Lightroom to import, backup and tag images. The working images are exported as tiffs and loaded into Photomatix pro, HDR software where the magic happens. I adjust and save the settings. The toned mapped image is dumped in the same directory as the original tiffs. The additional people images are cleaned up using a very old piece of software called Noise Ninja - I probably should use something a bit more unto date, but it served me well. The cleaned up tiffs were then run through Photomatix as single images with the same settings. This gives me a pretty close match, colour and tone to the master image so when I blend in the people, everything looks ok . . . well that's the theory and this was my first attempt!
I now have a dozen tiffs which I load into Photoshop from Adobe Bridge using the handy 'load as layers'. I was happy with the toned mapped image - the sky looked good and there was no ghosting, so I deleted the unwanted layers used to create the tone mapped image. I then ran through all the additional 'people' images and picked the parts I wanted in the final image. I use masks to punch through the top layers revealing the people below. It took me a while . . . I'm new at this. And I pulled in the neon text I wanted with the name of the restaurant in English.
Once I was happy with the composition I used Nik Software to add texture, tonal contrast and a touch of sky filter to add a little warmth. I darkened and reduced the saturation of the centre as it was a little overcooked. And to finish, noise reduction and sharpen for screen.
No comments:
Post a Comment